Instructor Manual
About
JAWS (Job Access with Speech) is a computer screen reader program for Microsoft Windows that reads the screen either with a text-to-speech output or by a Refreshable Braille display. Student can easily navigate uCertify course using JAWS shortcut keys.
Getting Started
Side Panel
So, if you have multiple courses in your library you can easily manage it under these categories. You can even create custom groups to organize it further.
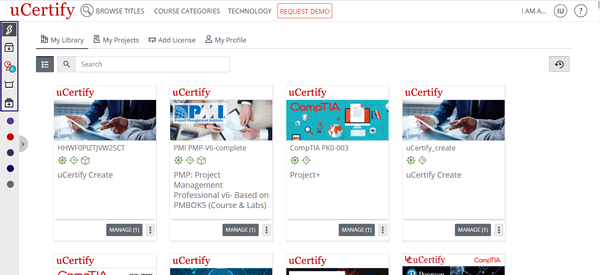
Figure 1.1: My Library Page with Pre-Defined Groups
Go to your My Library and click the Add group button.
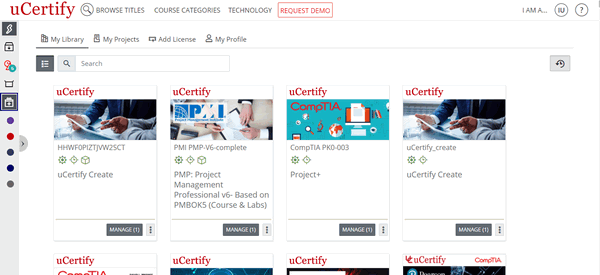
Figure 1.2: My Library Page with Add group button
Enter the name for the group of courses, which you want to create. Pick a color to identify your group and select the required courses for your group. Finally, click the Add button to create the group.
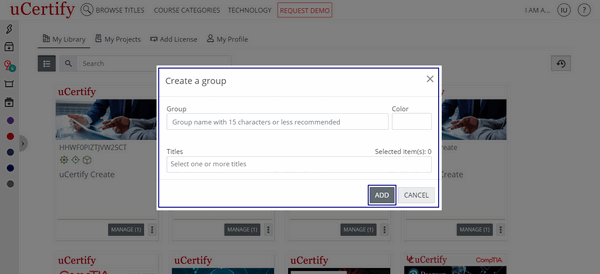
Figure 1.3: Create a group Modal Box with Add Button
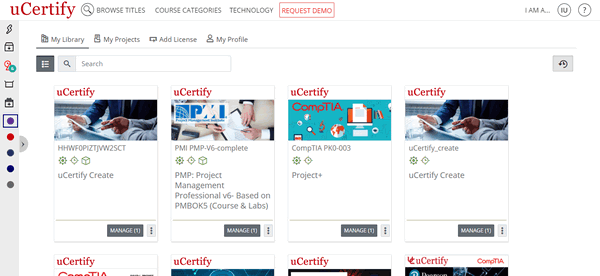
Figure 1.4: My Library Page with Course Group
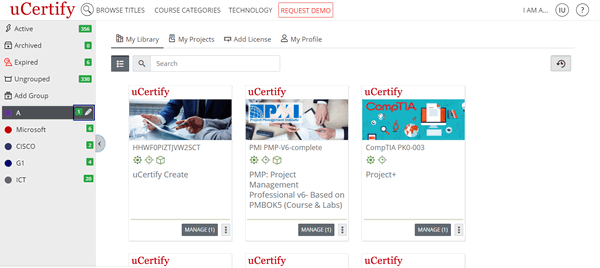
Figure 1.5: My Library Page with Edit Course Group Option
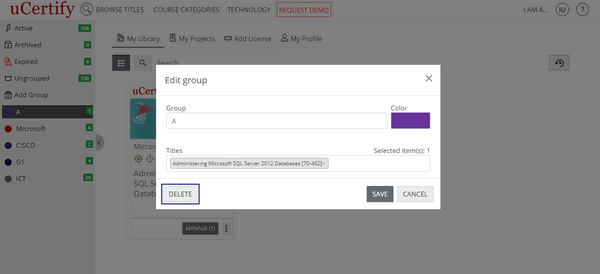
Figure 1.6: Edit Group Modal Box with Delete Button
Where to locate instructor tools
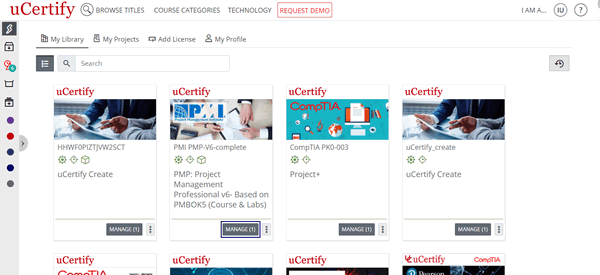
Figure 1.7: My Library Page with Manage Button
To add new section, click the Add new section button.
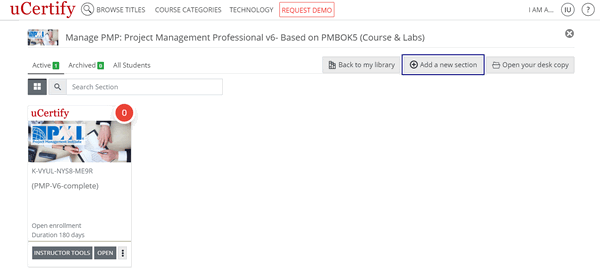
Figure 1.8: Manage Course Page with Add a new section Button
You can Create a New Section, Clone Using Section List, Clone Using Section Key. Provide the other required details and click the Save and manage section button.
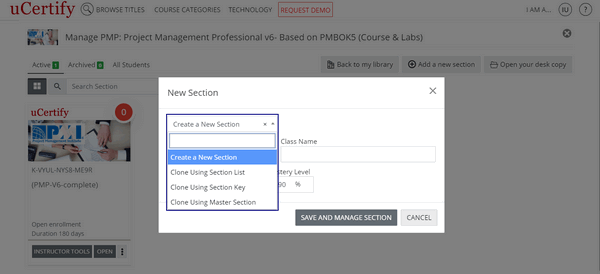
Figure 1.9: Manage Course Page with New Section Modal Box and Section Option Drop-Down
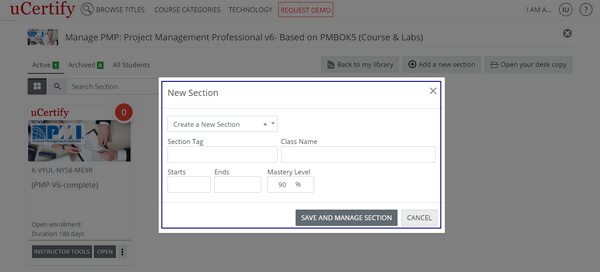
Figure 1.10: Manage Course Page with New Section Modal Box and Save and manage section button
Click the Instructor Tools button.
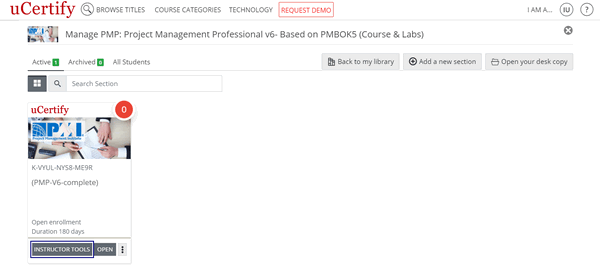
Figure 1.11: Manage Course Page with Instructor Tools Button
On the Dashboard, you will see the following horizontal tabs:
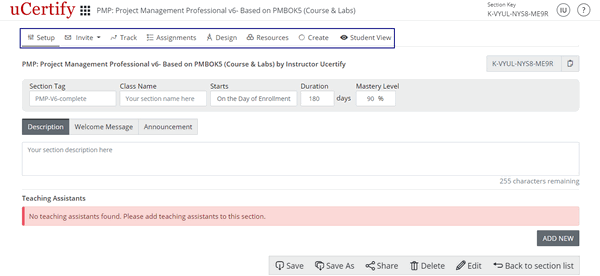
Figure 1.12: Setup Page with Tools Tab
How to exit instructor tools

Figure 1.13: My Library Drop-down with My Library Option
Providing students with the section key
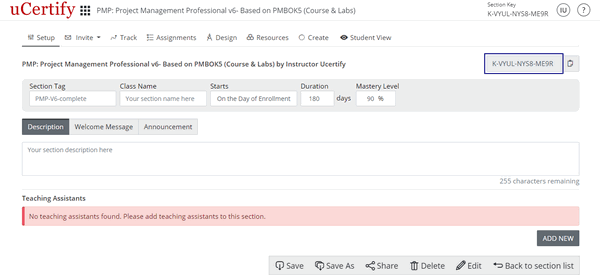
Figure 1.14: Setup Page with Section Key Box
There are two ways students can link with your course/section.
Method 1: Student has a 16-digit Access Code & a URL to submit it.
In this method, students will use their 16-digit Access Code in combination with the instructor keys to be linked with your particular course/section. Students will take the following steps:
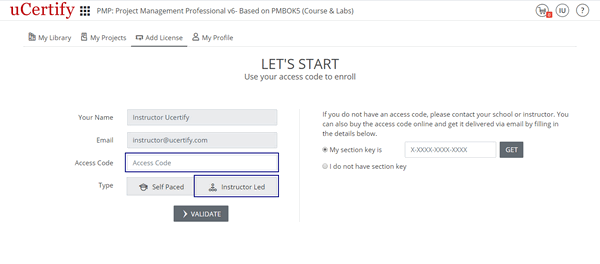
Figure 1.15: Add License Page
- The course enrollment page will open. Type the provided section key in the section key box or select the I will add section key later option from the drop-down and click the Enroll button to enroll in the course.
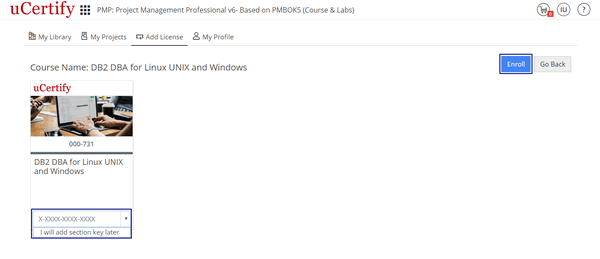
Figure 1.16: Course Enrollment Page in Instructor Led Mode with Section Key Option and Enrollment Button
- You can view the student information by clicking the Track tab.
Method 2: You can add the section key on the Dashboard.
Setting up your section

Figure 2.1: Instructor Tools Page with Add new section Button
The New section modal box will open.

Figure 2.2: Instructor Tools Page with New Section Modal Box
Provide the Section Name, Section Tag, Start Date, and End Date and click the Save and manage section button. You can also clone any previously created section using section list, section key, and master section. To do so, the Create a New Section drop-down, and select the required option.

Figure 2.3: New Section Modal Box with Create a New Section Drop-down Options
After creating a new section, you can edit/customize the Section Tag, Class Name, and Description.

Figure 2.4: Setup Page with Section Tag, Class Name, and Description
Set section Start Date (continuous enrollment)

Figure 2.5: Setup Page with Starts Heading Option
Choosing the Fixed Start option will allow you to set your section start date with the help of a calendar.
Set section Mastery Level

Figure 2.6: Setup Page with Course Mastery Level
Set a Welcome Message

Figure 2.7: Welcome Message Tab with Save Button
Set Announcement
_0002G5.gif)
Figure 2.8: Add Announcement Button with Announcement Message Box
To delete any announcement, click the delete button parallel to the announcement.
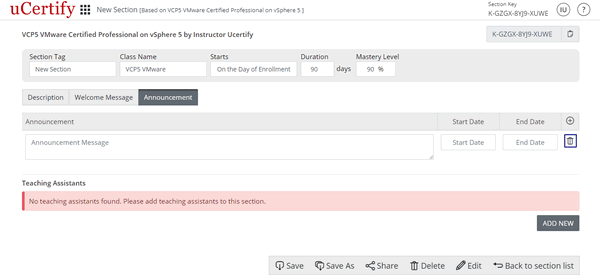
Figure 2.9: Setup Page with Delete Announcement Button
Add a Teaching Assistant
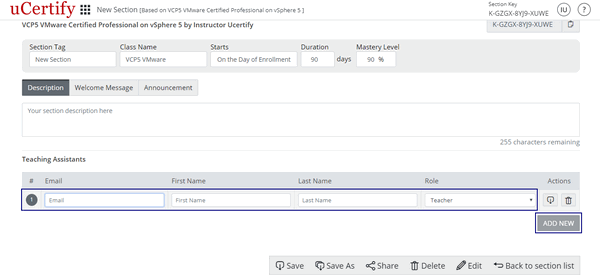
Figure 2.10: Add New Button with Teaching Assistant Details Boxes
Invite or Enroll Students

Figure 3.1: Invite Tab Options
Invite Students

Figure 3.1: Invite Tab with Bulk Upload
The Student(s) list page will open showing the Name of student, Access Code, Validation, and their Status. Check the checkbox parallel to the Student's Name and click the Enroll Selected button.

Figure 3.2: Student(s) List Page
To import the students using section list or section key, select the Import from Section, click the Import Type drop-down, and select the required option.

Figure 3.3: Invite tab with Import from Section
Enroll Students
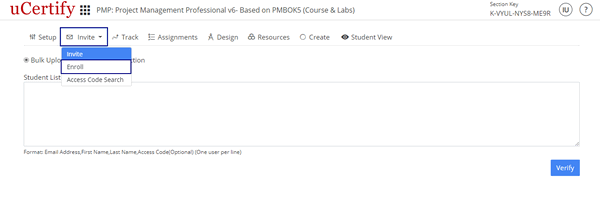
Figure 3.4: Invite Tab with Enroll Option
To enroll single student select the Enroll as a Student option, provide the required details, and click the Submit button.
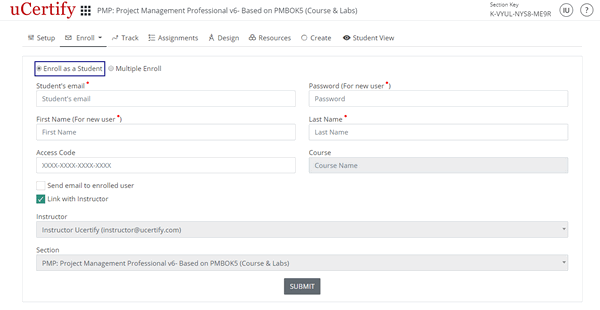
Figure 3.5: Enroll as a Student Page
To enroll multiple student select the Multiple Enroll option, provide the required details, and click the Next button.
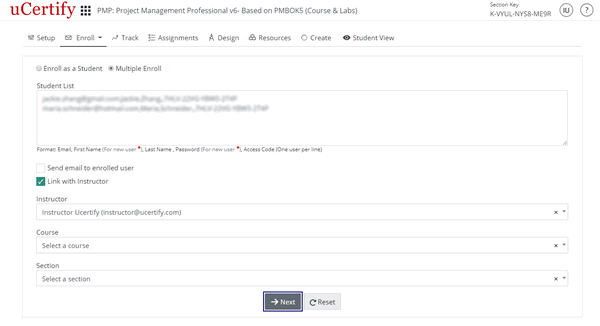
Figure 3.6: Multiple Enroll Page
Check the checkbox before the students Email and click the Enroll Selected button.
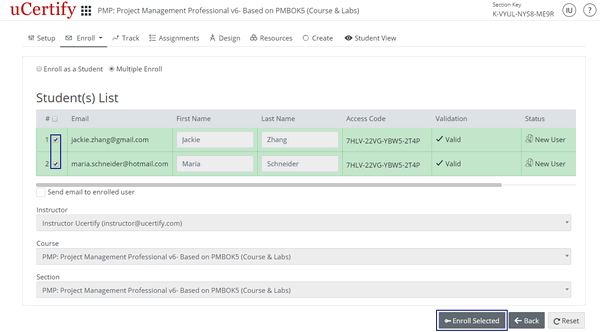
Figure 3.7: Student(s) List with Enroll Selected Option
Using Track to Manage your Course/Sections

Figure 4.1: Track Page
Demo Data

Figure 4.2: Student Demo Data
To view the demo data of students click the close button at the top right corner of the box. You will be able to see demo data of students with sample watermark on it & a pink box will appear on the bottom of the table. If you want to hide the sample watermark from the demo data, click the close button of the pink box.

Figure 4.3: Sample Watermark From Demo Data
Roster

Figure 4.4: Roster Tab
Set Tag

Figure 4.5: Track Tab with Set Tag Option
To remove a previously added set tag, click the close symbol. To add a new tag, type your tag in the Tag box. It will look for a suitable match based on your search, which will enable your tags to be consistent across multiple students.

Figure 4.6: Set Student Tag Modal Box
If no match is found, click enter and then click the Save button.

Figure 4.7: Set Student Tag Modal Box with Save Button
Set Section

Figure 4.8: Track Tab with Set Section Option
Select another section to move student from one section to another. Click the close button to remove student from that particular section. Click the Save button after selecting or removing course.

Figure 4.9: Set Student Section Modal Box with Save Button
Change Password
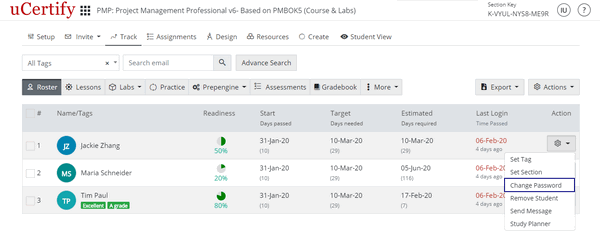
Figure 4.10: Track Tab with Change Password Option
Provide the required details and click the Save button.
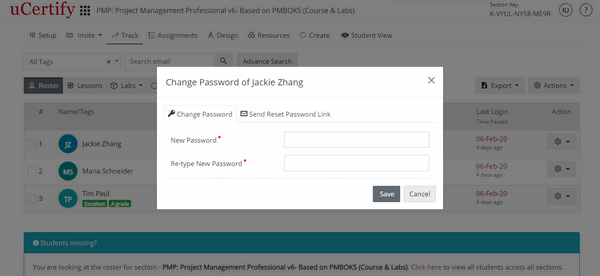
Figure 4.11: Change Password Modal Box with Change Password Tab
To send the reset password link to your student, click the Send Reset Password Link tab and click the blue button.
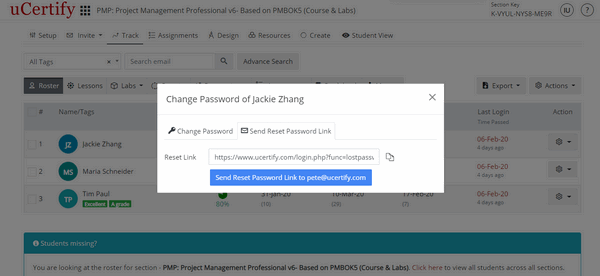
Figure 4.12: Change Password Modal Box with Send Reset Password Link Tab
Remove Student

Figure 4.13: Track Tab with Remove Student Option

Figure 4.14: Track Tab with Confirmation Modal Box
Send Message

Figure 4.15: Track Tab with Send Message Option

Figure 4.16: Send Message Modal Box
Study Planner

Figure 4.17: Track Tab with Study Planner Option
How to Filter Students
Export
Actions
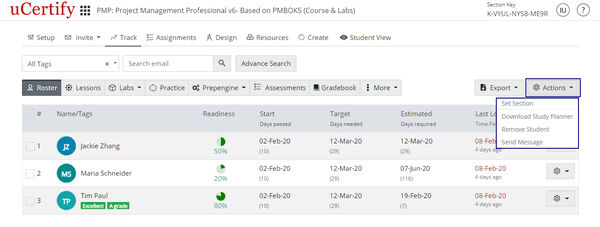
Lessons

Figure 4.28: Lessons Tab
Labs

Figure 4.29: Track Tab with Labs Tab Options
Practice

Figure 4.30: Practice Tab
You can also change the points of your students. To do so, click on any grade point. A modal box will open showing the test history. Click on the settings menu and then select the Review option.

Figure 4.31: Grade Point Modal Box of Student

Figure 4.32: Grade Point Modal Box with Review Option
You can delete your students test. To do so, select the Delete test option from the settings menu. Click the Yes button to delete the test.

Figure 4.33: Grade Point Modal Box with Delete Option
Prepengine Tab
This will show readiness or preparedness percentage attained by the students in Prepengine. This tab can be viewed in two views: Table view and Student view.

Figure 4.34: Track Tab with Prepengine Tab Options
Assessments
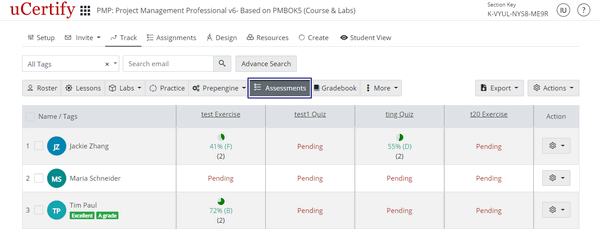
Figure 4.35: Assessments Tab
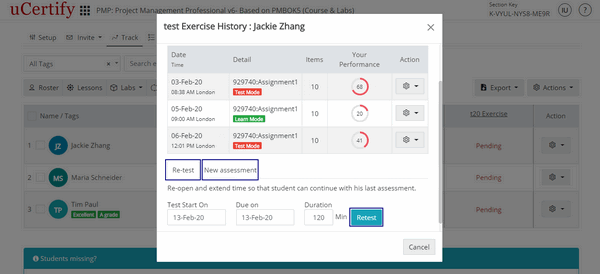
Figure 4.36: Test History Modal Box with Retest Button
Gradebook Tab

Figure 4.37: Gradebook Tab with Define Gradebook Button
You can export the gradebook of your students. To do so, click on the Export button and select the Gradebook option.

Figure 4.38: Gradebook Tab with Export Button Options
Select the file format option in which you want to download the gradebook and select the Percentage or Points option. Click the Download button. The gradebook will be downloaded with the settings provided by you.

Figure 4.39: Export Gradebook Modal Box
More
Assignments
Setting up assessments

Figure 5.1: Assignment Tab with Create New Assessment Button
- Provide the name for your assessment.
- Click the Selection Type drop-down, to choose the item selection procedure. There is a box next to the Selection Type drop-down:
Selected: It will show number of items which you have selected for the assessment. - Provide the duration for the assessment.
- Provide the passing score for the assessment.
- Select the feedback you want your students to get from the Feedback drop-down.
- Check the Untimed Test check box to disable the duration for the assessment.
- Provide the settings for the assessment.

Figure 5.2: Assessments Tab
- Check the Randomize and select checkbox under the Items heading to randomize the items.
- Check the Randomize checkbox under the Answer Options (when applicable) heading to randomize the answer of each item selected for the assessment.
- Check the Last item as “None of the above” checkbox to set the last option of an answer as none of the above.
- Provide the instructions for the test, if any.

Figure 5.3: Assessments Tab with Settings Options
- Select items for an assessment
- Search any item using search box. Type the item name and click the Search button.
- Choose a lesson from the Lessons drop-down, to select item from a particular lesson. If any lesson is selected exercise, test sets, labs, quiz, or assessment of that chapter will be shown.
- Click the desired tab to select item from that particular tab. (Green color denotes the selection.)
- Select the type of the item from the All Type drop-down.
- Click on the items you want to select.

Figure 5.4: Exercise Tab in Grid View
In the list view, as soon as the item gets selected, the right arrow on the item is changed to left arrow. All the selected items are shown on the table on the right side of the page.
To deselect any item in list view, click the delete icon of the required items from the right side table (In grid view, click the selected item to deselect them).

Figure 5.5: Exercise Tab in List View
You can create a copy and save the assessment with a new name. To do so, click the Save As button.

Figure 5.6: Exercise Tab with Save As Button
Enter the assessment name and click the Create a copy button.

Figure 5.7: Save As Modal Box
Auto selection of items

Figure 5.8: Assessments Tab with Auto Selection Option
Schedule assessments
Schedule the assessments after creating them. Click the settings menu next to the assessment which you want to schedule and select the Schedule option.

Figure 5.9: Assignments Tab with Schedule Option
Provide required details and then click the Save button to schedule your assessment.

Figure 5.10: Assignments Tab with Schedule Assessment Modal Box
Unschedule assessments
After scheduling assessment you can easily unschedule it. Click the settings menu and select the Unschedule option.

Figure 5.11: Assignments Tab with Unschedule Assessment Option
The Confirmation modal box will appear, click the OK button to unschedule the assessment.

Figure 5.12: Assignment Tab with Confirmation Modal Box
Assign assessments
You can assign the assessment to the desired student. Click the settings menu and select the Assign To option.

Figure 5.13: Assignments Tab with Assign To Option
Provide the following details:
- Select Students - It allows you to assign the assessment to a particular student.
- Test Start On - It allows you to set the starting date of the assignment.
- Due - It allows you to set the end date of the assignment.
- Time allowed - It allows you to set a time limit for the assignment.

Figure 5.14: Assign to students Modal Box
Modify assessments
You can modify an existing assessment created by you. Click the settings menu and select the Modify assessment option. This will redirect you to select the desired items.

Figure 5.15: Assignments Tab with Modify Option
Auto Selection

Figure 5.16: Assessments Tab with Auto Selection Option

Figure 5.17: Assessments Tab with My Selection Option
Preview assessment

Figure 5.18: Assignments Tab with Preview Assessment Option

Figure 5.19: Assessment Page with Go Back Button
Archive assessment
You can archive an existing assessment created by you. Click the settings menu and select the Archive assessment option.

Figure 5.20: Assignments Tab with Archive assessment Option
The Confirmation modal box will appear, click the OK button to archive the assessment.

Figure 5.21: Confirmation Modal Box with OK button
Delete assessment
You can delete an existing assessment created by you. Click the settings menu and select the Delete assessment option.

Figure 5.23: Assignments Tab with Delete Option
The Confirmation modal box will appear, click the OK button to delete the assessment.

Figure 5.23: Confirmation Modal Box with OK Button
Search Assessment and Filter Assessment Tabs
- All: This tab will show all the assessments across the section/course.
- My: This tab will show assessments created by you.
- Scheduled: This tab will show the scheduled assessments across the section/course. (This tab will appear if there are any scheduled assessment across the section/course.)

Figure 5.24: Assessments Tab with Filter Assessment Tabs
Reordering assessments
You can reorder the assessment as per your requirement. To do so, drag the desired assessment and drop it to the desired sequence. Click the Save button to reorder the assessment. Your assessment will be reordered as per the sequence provided by you.

Figure 5.25: Assignments Tab with Save Assessments Sequence Button
Sharing assessments
You can share the existing assessments of a section and import to the other section. To do so, click the arrow button parallel to the Create new assessment button and select the Share assessment option.

Figure 5.26: Assignments Tab with Share Assessment Option
The Shared key modal box will appear, click the clipboard button to copy the assessment key. If the assessment key is not visible, click the Generate key button and then click the clipboard button to copy the assessment key.

Figure 5.27: Assignments Tab with Shared Key Modal Box
Importing assessments

Figure 5.28: Assignments Tab with Import Assessment Option
Select the desired option:
Enter the Shared key and click the Get button.

Figure 5.29: Assessments Tab with Import Assessment Modal Box
Click the desired checkboxes of the assessments, which you want to copy/link and click the Link button. The copied assessments will be visible under the Assessments tab.

Figure 5.30: Import assessment Modal Box with Checkbox and Copy Button

Figure 5.31: Assessments Tab with Copied Assessments
Design Course/Section

Figure 6.1: Design Tab
Pre-Assessment

Figure 6.1: Test set : Pre Assessment Modal Box with Pencil Icon and Title, Description, and Items box
You will get the following tabs:
Schedule Test
Schedule Test tab allows you to set Start Date, End Date, Time Zone, Prerequisite, and Password of test.

Figure 6.2: Schedule Test Tab of Pre-Assessment Settings
Test Setup tab allows you to set test duration, tries allowed and perform the following actions:
- Randomize Items: It allows you to randomize items in the Pre-Assessment.
- Randomize options: It allows you to randomize options of the questions.
- Pausing allowed: It allows the student to pause the Pre-Assessment in between.
- Set last option as “None of the above”: It allows student to select “None of the Above” option in the Pre-Assessment.

Figure 6.3: Test Setup Tab of Pre-Assessment Settings
Levelling
Levelling tab allows you to manage the visibility of the Lessons and Post Assessments on the basis of readiness score.

Figure 6.4: Pre-Assessment Settings Modal Box with Levelling Tab
To do the required settings in Score (%), Lesson, or Post Assessment, click the Enable button at the bottom.
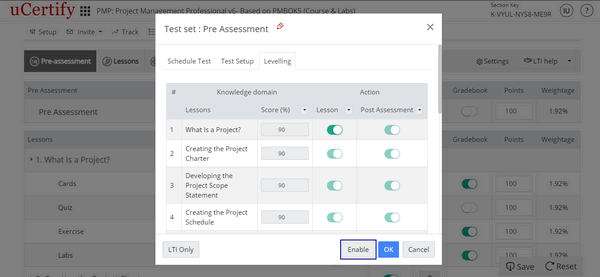
Figure 6.5: Pre-Assessment Levelling Modal Box with Enable Button
To set the readiness percentage for every lesson, click drop-down next to the >Score (%) option. Enter the desired readiness percentage and click the OK button.
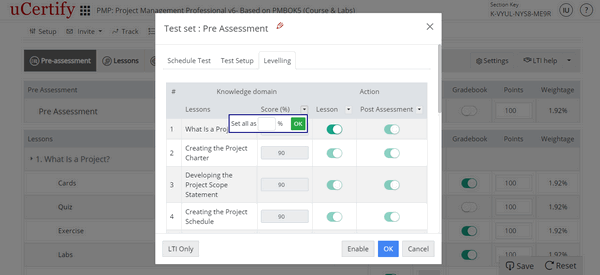
Figure 6.6: Pre-Assessment Levelling Modal Box with >Score(%) Drop-down
To turn Off or On the visibility of entire accessibility of every lesson or questions of a lesson in the Post Assessment, click the Lesson or Post Assessment drop-down, and select the desired option.
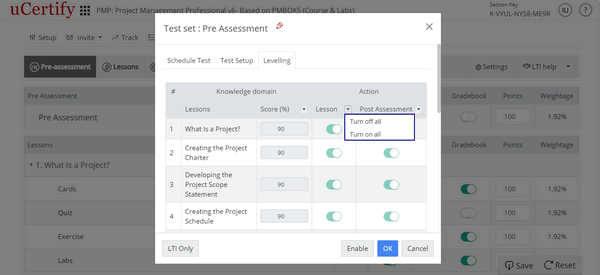
Figure 6.7: Pre-Assessment Levelling Modal Box with Lesson Drop-down
To turn Off or On the visibility of entire accessibility of every lesson or questions of a lesson in the Post Assessment, click the Lesson or Post Assessment drop-down and select the desired option.
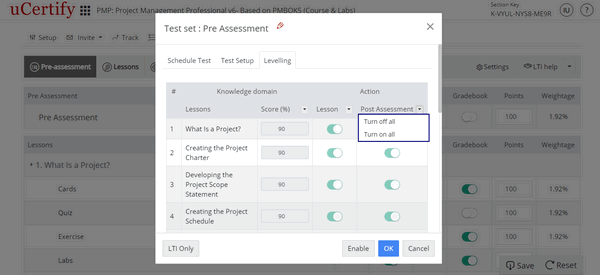
Figure 6.8: Pre-Assessment Levelling Modal Box with Post Assessment Drop-down
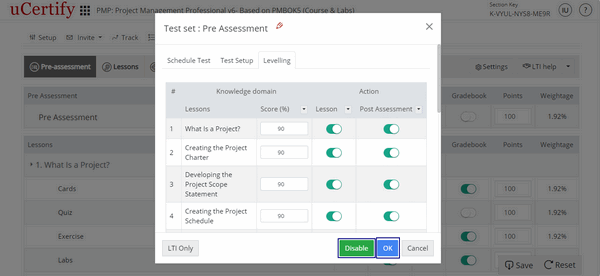
Figure 6.9: Pre-Assessment Levelling Modal Box with Disable and OK Button
- Items represents the number of items in the particular grade item.
- To hide desired grade items or chapters, under the Visibility option, click the On or Off button.
- To edit settings of the grade items or chapters, click the settings menu next to the desired grade item or chapter.
- The Points option represent the summative evaluation of a student’s performance across a grade item tracked in the Gradebook. Enter the Points parallel to the grade item.
- The Weightage option is based on the Points assigned in the Gradebook.
- To include or exclude grades of a particular item in the gradebook and sync, click the On or Off button, under the Report option, parallel to the grade item.
- To include or exclude grades of a particular item from the final grade calculation, click the On or Off button, under the Graded option, parallel to the grade item.
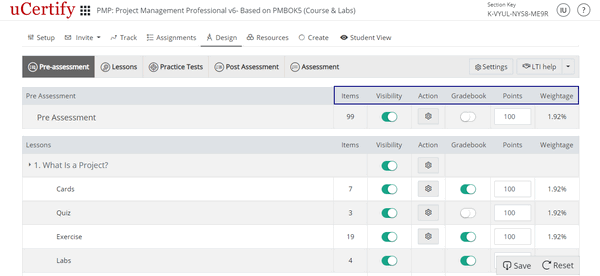
Figure 6.10: Design Tab with Options to Manage the Grade Items
LTI help and its use
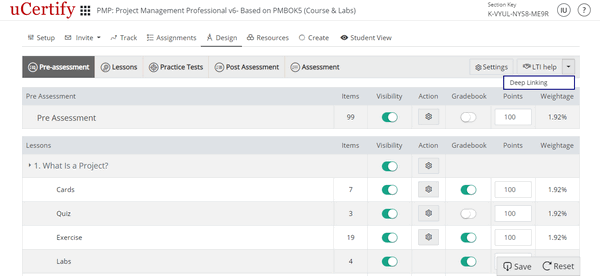
Figure 6.11: Drop-down Next to LTI Help Button
- Click the My LMS drop-down to select the desired LMS for creating the LTI link.
- Click the CRN drop-down to select the desired crn.
- Click the Module drop-down to select the desired module. If you want your LTI link to be secure, check if the Secure button is on.
- Different additional parameters related with the selected module will be visible. Select the desired options.
LTI link based on your selection will be created.

Figure 6.12: LTI Link Settings Wizard Page with LTI link.
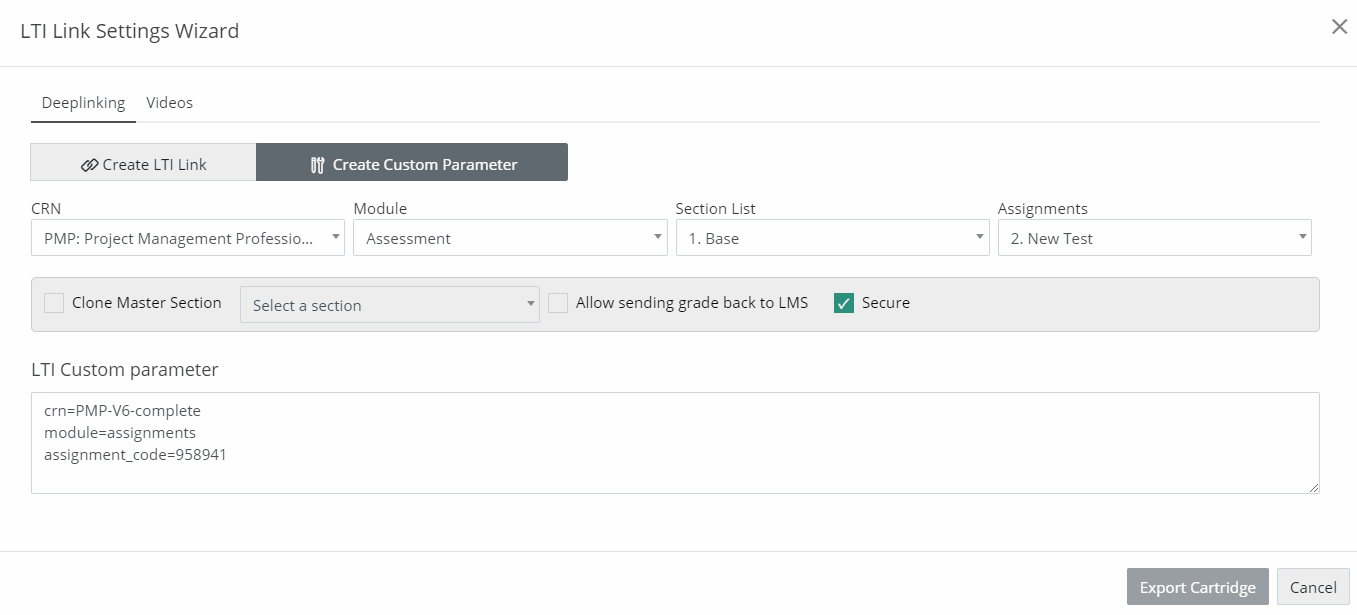
Figure 6.13: Create Custom Parameter Tab
Now, to view Videos related to the desired LMS integration, click the Videos tab.
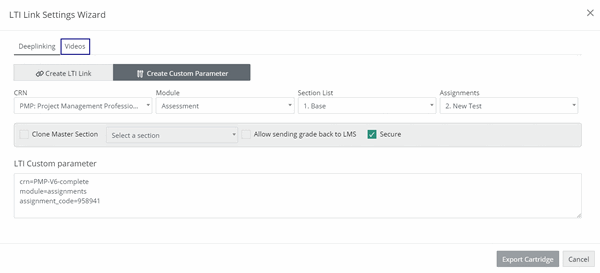
Figure 6.14: LTI Link Settings Wizard Page with Videos Tab
To view Guides related to the desired LMS integration, click the LTI help button on the Design page.
Lessons

Figure 6.15: Lesson Settings Modal Box
Settings of cards, quizzes, and exercises
To edit settings of the cards, quizzes, or exercises click the settings menu next to the desired cards, quizzes, or exercises.

Figure 6.16: Pre-Assessment Tab with Settings Menu of Cards, Quiz, and Exercise
Grade Scale

Figure 6.23: Settings Modal Box with Grade Scale Tab
Gradebook Settings
You can hide the gradebook from the tab or can make gradebook visible to students. To do so, click the Gradebook Settings tab and click the On or Off button as per the requirement. Click the Save button to freeze your preferences.

Figure 6.24: Settings Modal Box with Gradebook Settings Tab
Sequence

Figure 6.25: Settings Modal Box with Sequence Tab
Resources
The Resources tab allows you to download and upload the resources, such as: course-slides, answer-keys, and other reference or study materials related to the course. Click the Download button to download the desired resource.

Figure 7.1: Resourses Tab with Download Button
To upload any resource for your students, click the Upload Files button and select the desired file.

Figure 7.2: Resources Tab with Upload Files Button
To edit the resource uploaded by you, click the settings menu next to the uploaded resource and select the Edit Resource option. Enter the desired title and required description for your resource. Finally, click the Save button to freeze your preferences.

Figure 7.3: Resources Tab with Edit Resource Option
To delete the resource uploaded by you, click the Delete Resource option. Click the OK button to confirm.

Figure 7.4: Resources Tab with Delete Resource Option.
Student View
You can view your course or section as a student by clicking the Student View tab.

Figure 8.1: Highlighted Student View Tab

Figure 8.2: Student Dashboard
Administrative Functions
How to create and clone a master section
Go to the Setup tab and click the Save As button at the bottom. The Save as modal box will open. Select the Clone Section option and provide the details as per the selection. Provide Section Tag, Class Name and click the SAVE AND MANAGE SECTION button.

Figure 9.1: Setup Tab with Save as Modal Box
Click the Share button at the bottom to share your course or section with the desired person. The Share with modal box will open. Select the Salutation and provide the Email, First Name, and Last Name of the person with whom you want to share the course or section. Finally, click the Share button.

Figure 9.2: Setup Tab with Share with Modal Box